Kynari Aviary is a dungeon located in the Sacred Grove in southwest Darkrane Forest. To walk here, go to Lake Kisia and move to the right of the lake.
Its recommended that you use a Portal Scroll to move to the Ascension Gate instead of walking. There are some very strong mobs below the Ascension Gate that can killl lower leveled players easily.
This dungeon takes a long time to run due to its size. The mobs are not exceptionally difficult, but there are a lot of them.
Its recommended that you wait until you have all of the quests for this dungeon before you run it due to the time it takes.
Overview[]
- Level Required: 51
- Key/Crystal: Suzuaku, Hawk, Falcon
- Party Members: None
- Time Limit -Normal: 3 hours
- Time Limit - Hard: 3 hours 30 minutes
- Time Limit - Elite: 4 hours
- Daily Limit: None
There are a total of 29 quests to be completed in this dungeon:
| Lvl | Quest Name | NPC | Task to Complete |
|---|---|---|---|
| 54 | [Normal] Main Force | Cyril Berleand | Kill Gladiators, Assassins, and Royal Guards |
| 55 | [Glorious] Weapon of the 09 Company Force | Otto von Schroder | Talk to Alchemist Issac |
| 55 | [Common] Blessing of Naser (Daily) | Alchemist Issac | Kill Seridunn |
| 55 | Proof of slaying Seridunn (Daily) | Darden | Kill Seridunn |
| 56 | [Normal] Lazapas of Fury | Major Jade | Kill Furious Lazapas |
| 56 | [Normal] Quartz of Freezing | Pamela Villas | Kill Freezing Flames |
| 56 | [Normal] Mutant Kynari | Garina | Kill Royal Guard Captain Garine and Bodyguard Captain Ahorn |
| 56 | [Normal] Hardy Plants | Merchant Luis | Kill Ancient Trents |
| 56 | [Normal] Wild Glambek | Helen Stadler | Collect Wild Glambek |
| 56 | [Normal] Darkness Hunter | Hattori Hanzo | Kill Darkness Hunters |
| 56 | [Normal] The Hermit of the Forest | Hakks | Kill Healing and Hypnotic Xylemias |
| 56 | [Normal] True Victory | Hakks | Kill High Castor Darkrane |
| 56 | [Normal] Equipment of the Devil | Blacksmith Dean | Kill Shiraz for Shiraz's Swords |
| 56 | [Normal] The God of Kynari | Theletar Solurn | Kill Seridunn |
| 58 | [Hard] Lion Mushroom | Alchemist Issac | Kill Gladiators, Assassins, and Royal Guards |
| 58 | [Hard] Gold Flower | Yvette Trincia | Collect Golden Flowers |
| 58 | [Hard] Evidence | Sezen Arar | Kill Cursed and Screaming Xylemia |
| 58 | [Hard] Destroying Lazapas | Otto von Schroder | Kill Furious and Blasting Lazapas |
| 58 | [Hard] Pellurite Materials | Alchemist Issac | Kill Thorn, Iron Needle, and Poison Minions |
| 58 | [Hard] Totem of Order | Hakks | Kill Royal Guard Captain Garine and Bodyguard Captain Ahorn |
| 58 | [Hard] Giant Angler | Savedge | Kill Herculean Bubas for the tear |
| 58 | [Hard] Vegal's Totem | Theletar Solurm | Activate Totem of Vegal and kill monster |
| 58 | [Hard] Revenge in a Hundred Days | Juda Lucid | Kill Blood Witches and Titans |
| 58 | [Hard] Biamgra | Captain Dante | Kill Spectres of Hate and Nemesis |
| 58 | [Hard] Materials for the Saddle | Merchant Luis | Kill Dark and Bloody Hunters |
| 58 | [Hard] For the Peace of the Forest | Major Jade | Kill Xylemphia and High Castor Darkrane |
| 58 | [Hard] Sealed Scinic | Theletar Solurn | Kill Seridunn |
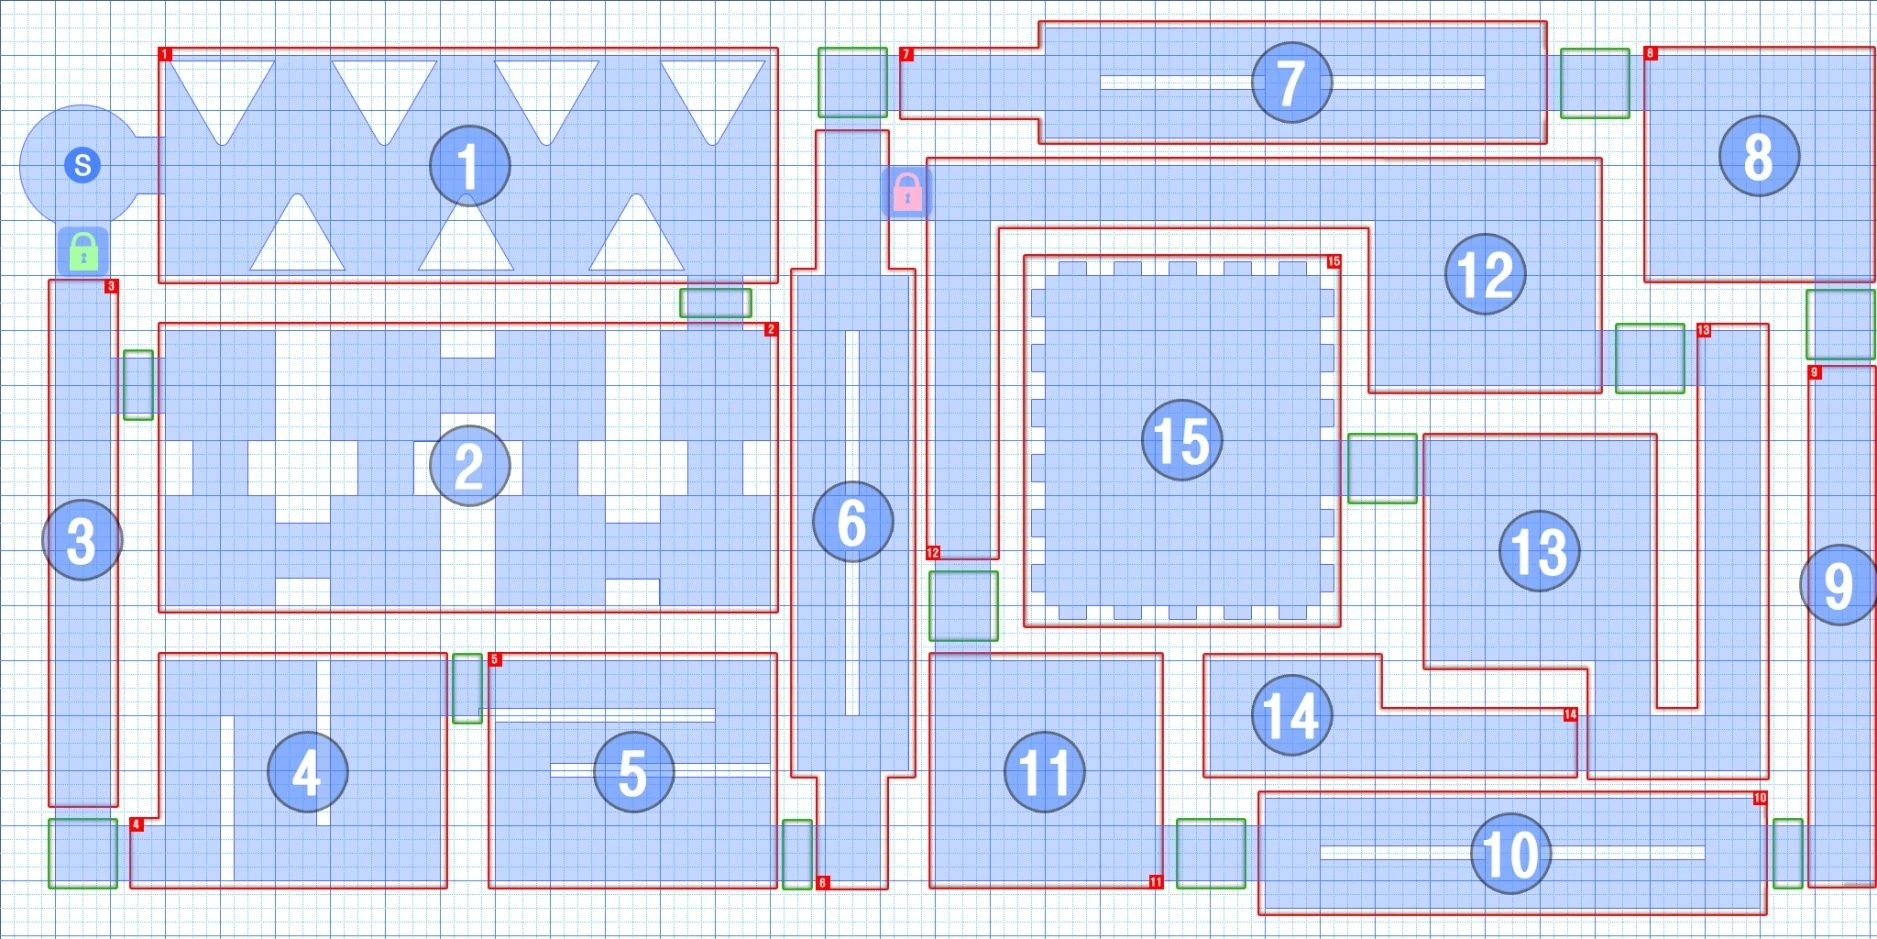
Inside the Kynari Aviary[]
Crystal required for entry may be purchased at the merchant beside the portal.
Area 1[]
The 1st mobs you encounter are Aviary Gladiators and Aviary Assassins and they are placed closely in such a way that if you disturb one group of mobs, mobs in other groups will also attack. Assassins (ranged) have a debuff that can paralyze. Towards the end of this section, you will find Aviary Royal Guards in addition to the previous Kynari.
Area 2[]
This area has 8 rooms which contain Mutant Minions, Cursed and Screaming Xylemia, and Furious Lazapas. The mobs in these rooms are dense and difficult to pull at times. Being able to kill the entire room at one time in a minimal amount of attacks will be helpful for speed. Lazapas have a Warrior-style charge attack which can stun.
Area 3[]
This area is 1 long hallway that is full of Thorn Minions, Freezing Flames, and Aviary Gardeners. The Minions have a debuff that can slow players and the Flames have a freezing skill.
Area 4[]
This area contains Aviary Spearmen, Aviary Royal Soldiers, Aviary Snipers, and Solar Flames. Snipers can paralyze players like the Assassins in the 1st room. The Spearmen and Royal Soldiers have small AoE spells they may use.
Bodyguard Captain Ahorn and Royal Guard Captain Garine are located in this room and can cast a debuff that can silence and immobilize.
Area 5[]
This room is the same size as the last and zigzags in the same manner as the last. Its a swamp themed room and contains Pus Butos and Herculean Bubas. The Butos can cast a slow debuff called Poison Sac and have a small AoE attack that inflicts Poison Pus. The Bubas have AoE attacks.
The boss in this area is called Gigantic Buto Ignahan (he drops the Walk Key) and it has an AoE paralysis debuff as well as a 2 buffs. One, Poison Fluis, that increases his defense and Sleeping Sac can be cast when he is at low health.
Area 6[]
This room is split by a large wall up the center so you can take one side or the other if you wish to save time, there is an area in the middle of the map where you can switch sides. This room contains Deep Wood Trivions, Poison Needle Minions, Aviary Tatars and Ancient Trents. Trivions cast Sticky Sap which is a slow debuff. Minions can cast Poison Needle which is a paralysis attack. Trents can cast both Poison Needle and Poison Pus which is a strong DoT AoE to be wary of.
Area 7[]
This room is similar to the last as far as layout. It contains more Deep Wood Trivions, Poison needle Minions, and Titans. Titans have AoEs and can stun using the Hammer Chop skill.
Area 8[]
This is a smaller map compared to the previous and contains Nocturnal Croshus, Darkness Hunters, and Spectre of Hate. The Croshus don't have any debuffs or spells, Hunters have Steel Whip Tail which stuns and Darkness Breath which is an AoE that reduces accuracy of hits and slows. Steel Roar is a skill Hunters can use when at low health. Demolition can use Touch of Demolition which slows and Light of Demolition that is an AoE that can silence.
Area 9[]
This room is a long valley and it contains Electic Flames, Iron Needle Minions, and Kynari Overseers. The Flames have a Lighning Touch spell which is a DoT skill and Minions have Steel Thorn that is another DoT that slows and reduces healing. The Overseers have small AoE skills.
Area 10[]
This area is long and contains Deep Wood Trivions, Poison Need Trivions, and 2 Blood Witches. The Witches cast Thorn Strike which reduces healing and can cast Blood Curtain to increase their damage when at low health. This skill heals them when they take damage, they will throw their arms in the air and a divine ward buff will appear when they are using this skill.
Area 11[]
This room has 2 Spectres of Hate, Bloody Croshus, and Croshu Hunters. The Croshus and Hunters can both cast Steel Spine Tail and Spine Tail to reduce healing value and Blood Red Breath which reduces armor durability.
Area 12[]
This room has Lapiko's Trivion, Xylemia Healers, Xylemia Hypnotists, and Lapiko's Tatars. Trivions have a ranged debuff called Acid Sap to reduce armor durability. Healers can cast Raise Thorn to slow and it can heal itself. Hypnotists can cast Hypnotic of Forest debuff which causes sleep and Thorn Awn that reduces healing. Tatars appear toward the end of this room enmasse and can overwelm unsuspecting parties.
At the end is 2 Xylemia Healers and the boss Xylemphia. This boss can cast Deadly Poison Thorn which is a strong DoT that can petrify, Thorn Awl that reduces healing, Seed of Forest which is inflict damage after an amount of time, and Hatching which causes paralysis.
Area 13[]
This area has a long valley filled with Shirazs of Hell that leads to a large room with Lazapas and Shirazs of Hell. The Lazapas can stun, and have a powerful AoE attack. The Shiraz of Hell have small AoEs and can cast Fear of Death that inflicts fear on the player. The Shiraz can remove buffs from the player causing dmg with each one they remove (does not include potions), similar to castigate.
High Castor Darkrane is located in this room as well. He can cast Powerful Storm of Blade that immobilizes and Silences as well as Fear of Death. When he dies, 2 Darkrane's Souls appear and have similar attacks to the Spectre of Hate.
Shiraz attack pattern: Normal attack, Fear, Stun, Buff Removal, Normal attack
Area 14[]
To the left (west) of the entrance to the large room in Area 13, you will find Area 14 which is filled with Bloody Croshu and Croshu Hunters.
Area 15[]
This room is accessible from Area 13, not area 14. This is the area where the dungeon boss is located. First, there are 2 Shirazs of Hell at the entrance. There are Hell Wing Vespers outside the room that can cast Super Sonic which inflicts silence. Inside the room are several Spectres of Nemesis that can use Armor of Demolition which is a reflect damage buff. There are 2 Shirazs of Hell (removes stuns, fears, and removes buffs) standing next to the statue of Seridunn.
In the center of the room is Gorr which must be killed to summon Seridunn. Gorr can cast Raise Thorn, a DoT petrify debuff that hits the player farthest south on the map. If the party is lower leveled, a pally should be hitting Gorr while a warrior runs farthest south to take this hit while everyone else hides behind the wall. Once he is dead, have all party members check their inventories for Gorr's Heart.
To the right of the entrance to Seridunn's arena, there is a statue called the "Totem of Seridunn". The player with Gorr's Heart must click on this totem to summon Seridunn. Seridunn can cast Spirit Absorb which heals her, Pain Reverse which reflects damage, Wound of Ground that decreases armor durability, Touch of Heaven's Judgement that silences, and can stun when her health is low. She can also cast Fear. She has the same buff removal skill as Shiraz do.
- 20 second Reflect casted throughout battle
- At 75% health: Use Aika's Grace on the pally while everyone else is behind the wall to avoid the powerful AoE Seridunn casts around this time.
- At 50% health: Seridunn begins casting pertrify
- At 25% health: Seridunn teleports all party members to herself and stuns everyone
- Around 25% health the 20 second Reflect buff turns to Blood Curtain
The other members of the party can hide behind the wall while the pally kills Seridunn, but the pally should pull Seridunn close enough to the party that the clerics can heal them. This will keep the other members from dying from AoEs.
Drops[]
Normal Mode[]
- All Mobs & Bosses: Level 56 Equips, Forest Essence, Pellurite [C], Rubicine [C]
- Royal Guard Captain Garine: Walk Key (Normal)
- Bodyguard Captain Ahorn: Walk Key (Normal)
- Gigantic Buto Ignahan: Walk Key (Normal)
- Xylemphia: Park Key (Normal)
- Gorr: Park Key (Normal)
- Seridunn: Blue Core of Seridunn (Normal), Leaf of Life
Hard Mode[]
- Seridunn: Green Core of Seridunn (Hard)
Elite Mode[]
- All Mobs & Bosses Level 56 Equips, Pellurite [B] and Rubicine [B]
- Royal Guard Captain Garine: Walk Key (Elite), Gloves DIYs of Nature's Blessing
- Bodyguard Captain Ahorn: Walk Key (Elite), Gloves DIYs of Nature's Blessing
- Gigantic Buto Ignahan: Walk Key (Ellite), Leaf of Life, Boots DIYs of Nature's Blessing
- Xylemphia: Park Key (Elite), Leaf of Life, Helmet DIYs of Nature's Blessing
- Gorr: Park Key (Elite), Weapon of Nature's Blessing DIY
- High Castor Darkrane: Pellurite [B], Rubicine [B], Leaf of Life, Armor & Shield DIYs of Nature's Blessing
- Seridunn: Level 56 Superior Equips, Red Core of Seridunn (Elite), Leaf of Life, Old Sealed Box, (Contains Sealing Scroll for any gear or Empty Box)
[]
Note: Blue core of Seridunn gives Armor enchants, Green Core of Seridunn Accesory enchants and Red Core of Seridunn Weapon Enchants, the drop is low or medium and there is a chance to get bad enchants or Good Enchants[]
Hell Mode[]
There is pending information on where exactly which mob drop this
Can adquire:
- Rubicine S, Pellurite S
- Pellurite Extract S, Enriched Pellurite Extract S
- Rubicine Extract S, Enriched Rubicine Extract S
- Unique Recipe -S- All Classes
- Lv90 Heaven Pieces
- Craft materials for Unique Recipe -S-, Shining Meteor Fragment, Root of evil
There more Items pending